
Today we will talk about how to remove a bike chain without special tools.
The bike chain is a very important part of the bicycle and its functioning. It is used to connect the chainring to the crank arm and is one of the most important parts of the bicycle. If you’re looking to remove a bike chain without any special tools, there are a few easy steps you can take. Removing a bike chain is a necessary task when cleaning or replacing it, but you don’t always need specialized tools to do it. In this guide, we’ll show you how to remove a bike chain without special tools using only a hammer, a nail, and pliers or a flat tool.
By following these easy steps, you’ll be able to remove the chain from your bike without having to invest in any expensive tools. Whether you’re a seasoned cyclist or a beginner, this guide will help you quickly and easily remove your bike chain so you can keep your ride running smoothly.
Locating a Master Link Remove a Bike Chain
Removing a bike chain is a necessary task when cleaning or replacing it, but before you get started, it’s important to locate the master link. The master link is a special link in the chain that can be easily disconnected without the need for any special tools. Here’s how to locate the master link:
Look for a link in your chain that looks different from the others. The master link may have a different shape, color, or be marked with a logo or symbol.
Check the owner’s manual or manufacturer’s website for information on locating the master link for your specific bike model.
If you can’t find the master link, inspect the Remove a Bike Chain for any links that have a pin that can be easily removed with a chain tool.
If your chain doesn’t have a master link or a quick link, you’ll need to use a chain tool to remove it.
Shift bike into smallest chainring and smallest rear cog
Before removing your bike chain, you should shift the bike into the smallest chainring and smallest rear cog. This will create slack in the chain, making it easier to remove. Here’s how to do it:
Shift the bike into the smallest chainring. This is usually the one closest to the bike frame.
Shift the bike into the smallest rear cog. This is usually the one furthest away from the bike frame.
Pedal backwards to ensure the chain is fully on the smallest rear cog.
Check that the chain is loose and has slack in it. This will make it easier to Remove a Bike Chain the chain pin.
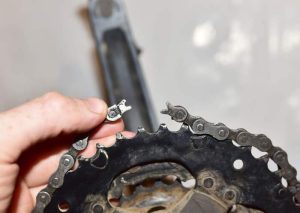
Locate chain pin
The chain pin is the small metal pin that holds the links of the chain together. Before you can Remove a Bike Chain, you’ll need to locate the chain pin.
Look closely at the chain and identify a link that has a slightly different appearance than the others. This is the link that contains the chain pin.
Position the chain so that the link with the chain pin is at the top of the chain and facing outward.
Use a chain tool to align the chain pin with the extractor slot on the chain tool. The extractor slot is the opening on the chain tool that the chain pin will be pushed through.
Turn the handle of the chain tool to push the chain pin out of the link. Be careful not to push the pin all the way through, as this can damage the chain.
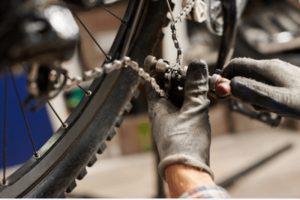
Use hammer and nail to push the chain pin out
Once you’ve located the chain pin, you can use a hammer and a nail to push it out of the chain.
Place the nail over the chain pin, making sure it is centered on the pin.
Hold the nail in place with one hand, and use the hammer to tap the end of the nail lightly. This will begin to push the chain pin out of the link.
Continue tapping the nail gently with the hammer until the chain pin is pushed out of the link. Be careful not to hit the nail too hard, as this can damage the chain.
Once the chain pin is partially out of the link, use pliers or a flat tool to pull it the rest of the way out. Grip the chain pin firmly and pull it straight out of the link.
Repeat this process for any additional chain pins you need to remove in order to separate the chain from the bike.
Reassemble the chain with the chain tool
To reassemble the chain, you will need a chain tool. Here are the steps:
Place the two ends of the chain together, with the outer plates facing outwards.
Insert the chain pin into the hole in the outer plate of one end of the chain.
Place the chain tool on the other end of the chain, with the pin of the tool aligned with the pin hole in the other outer plate.
Slowly turn the chain tool handle clockwise, pushing the pin through the outer plate and the inner plates of the chain until it emerges on the other side.
Turn the chain tool handle counterclockwise to Remove a Bike Chain the tool from the chain.
Check the chain for any stiff links or other issues. If you find any problems, use the chain tool to adjust the length of the chain or remove damaged links.
Lubricate the chain with chain lubricant to ensure smooth operation.
By following these steps, you can reassemble Remove a Bike Chain with the chain tool. Just remember to take your time and be careful when using the tool to avoid damaging the chain.
FAQ
Here are some frequently asked questions about removing a bike chain without special tools:
1. How to remove a bike chain without special tools?
It is very easy to remove a bicycle chain without any special tools. You can use a regular pair of pliers or even your fingers. Just make sure that you have the right tool for the job.
2. Why do I need to remove a bicycle chain without special tools?
It is a good idea to remove the chain from time to time. This will keep the chain in good condition. If the chain is not removed, it can get rusty and become difficult to remove.
3. How can I get a new chain?
You can go to your local bike shop and they will replace your chain for free.
4. How do I know if I’m putting the chain on correctly?
You should feel the chain move as you put it on. If you don’t feel it moving, you may be putting it on wrong.
Final Words:
Removing a bike chain without special tools is a straightforward process that can be done with a few basic household items. By following the steps outlined above, you can easily Remove a Bike Chain and inspect it for wear or damage. It’s important to handle the chain carefully to avoid damaging it, and to inspect it thoroughly before re-installing it or replacing it if necessary. With a little patience and attention to detail, you can successfully remove and reassemble your bike chain without the need for any special tools.

2 thoughts on “How to Remove a Bike Chain Without Special Tools – Easy Steps ”